
Tech Tips
OEMY'S DIY CAI
I have had a number of requests asking about my DIY Verison of the CAI (Cold Air Intake).
First a bit of history is needed:
- Version 1 was functional but it was very loud. It was made from light weight PVC pipe, a small battery box and a 4-layer K & N filter I had.
- Version 2 was much better. It was also made from lightweight PVC pipe, a
larger battery box and a much bigger 8-layer S & B filter.
- I routed the air pickup to the bottom of the front cap and created a mini ram air intake.
- Version 3 was a modification to the version 2 system. I removed the PVC pipe, used 2 pieces of 45 4" aluminum tubing, a 4" to 3.75" reducer to connect the MAF sensor to the aluminum tubing, some 4" silicone hose to connect the aluminum tubing together and stainless steel hose clamps to hold it all together.
How Well does it work?
- It's quite as the stock OEM system.
- It's easy to service
- I have driven through heavy rain with no problems.
- It's lightweight.
PARTS
- Filter - S&B Filters R0862
- Battery Box - Wal Mart
- 6" Start Collar - Lowes/Home Depot
Note - Measure the start collar before you cut the hole as you may find the collar is less than 6" in diameter. - Some 1/4" rubber tubing to act as a seal/cushion.

- 45 4" Aluminum Tubing - Verocious Motorsports
- 3.75" to 4" Reducer - Verocious Motorsports
- 4" Silicone Hose - Verocious Motorsports
- 4" Stainless Steel Hose Clamps - Verocious Motorsports

- 90 floor register - Lowes/Home Depot
Note - You will have crimp the connector to allow the aluminum connecting tube to fit "OVER" the fitting.

Remove The OEM Air Intake

Put It All Together


Dead Bolt Repair
I almost forgot about this one. If you have this style of door lock be aware that the dead bolt can fail and you will be locked in or locked out. You should also be aware that it uses a T-20 Torx style bit to remove the screws.

We used to use the deadbolt all the time, until one day I went to unlock the door and the deadbolt didn't move. Bummer, we are locked in. I was lucky enough to get it to work and open the door. I then proceeded to take it apart to see what was broken.

Yep, a metal insert, a piece of plastic and a retaining ring are all there is to it. You can order the parts from Trimark Newhampton, IA 1-800-431-8616.
Parts
- Dead bolt knob for white inside = 81482 - .97
- Retaining clip = 80967 - .07
OEM Fuse Panels
Many of you do not have access to the OEM chassis documents. So, I thought I would publish the fuse panel layouts.
Coach Panel


Convenience Panel


Chassis Panel

Note - The above OEM diagram needs to be rotated 180 to the left. Compare it to the last photo of the panel posted below.


ABS Sensor
I had a series of unrelated events happen on a short w/e RV trip.
- My Actia IP cluster went nuts.
- The cluster will get replaced for the 2nd time.
- I lost all my turn signals, brake lights, cruise control, hazard lights
and Hydro Max electric boost pump due to a short in my toad harness.
- I fixed the toad harness and created a tester for that.
- My ABS light came on.
I checked everything under the sun for the ABS light. I looked for worn cables in the steering column, in the engine compartment (under the dog house), checked for blown fuses and even ran a scan for DTC (Diagnostic Trouble Codes). I discussed this with Mike Bronzini (Brazel's RV) and decided to clean the ABS Sensors. That fixed the problem.
The ABS sensors are held in a copper cage. To remove them just twist and pull them out. Clean the with a rag and some brake cleaner. Add a dab of lithium grease and reinstall. Just make sure they are on the way in the bore and seated.
After you have cleaned and lubed all the sensors you need to reset the ABS system. Start the engine but do NOT step on the brake as it takes about 20 secs for the system to reset. If all else fails you will probably have to take the rig for a short trip before the ABS system is reset and the ABS light will go out. If this does not fix the problem you may have a bad sensor. You can check them with an ohm meter. A good sensor should have a reading between 1,100 to 1,300 ohms. If you are using a cheap Harbor Freight style multimeter you will want to set the meter to 2000k scale. Replacements can be purchased from my Product Catalog.
ABS Sensor

ABS Sensor Removed

Black Tank Flush Valve
If you have a checklist this is a must. It seems since about 2004 ALL RV's with a black tank flushing system MUST have a Vacuum Break/Check Valve in the system by Federal mandate.

For this thing to work correctly it must be mounted some 20+" above the black tank. Generally, this means it will be under the bathroom sink. Needless to say when it malfunctions you have water dripping/running under the sink. This can ruin your day especially when you forget to turn off the water and are gone for the day.
I had this happen on a Friday night. It took about 15 minutes for me to figure out and find the source of the water dripping under the coach.
I removed, cleaned and reinstalled the vacuum break but that didn't fix the problem. So, I shut off the water and went to bed. Saturday morning I went to the local hardware store to find a bypass. No luck as there was no 1/2" threaded PEX elbow to be had. So, I made one from a 1/2" PVC threaded elbow, 1/2" threaded straight and a short piece of 1/2" PVC pipe.

I ordered a replacement part from the dealer thru Newmar. Boy are they proud of that part. My cost was $52.47 including UPS shipping. When I got the replacement part I noticed that logo on the top was different from the one I removed. So, I looked the company up on the Internet. Lo and behold they were located in Austin, TX about 35 miles from me. I called them, it is a family operation and it is their #1 product. Needless to say, he will ship you one for $17 USPS. If you think you might need one contact Lakeview RV Supply 512-261-8000.
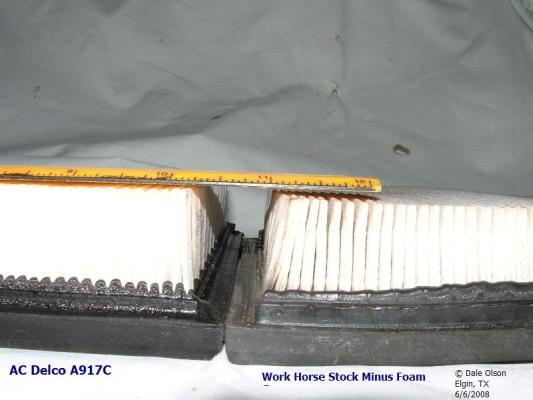
OEM Air Filter
Do you check and/or change your air filter on a regular basis? Compare the difference in the photos below of a stock OEM-style air filter (with the foam cover removed) and a new AC Delco A917C.
Note - The stock filter only has about 10,000 miles of usage.

Foam cover or no foam cover? Me, I would remove the foam cover and toss it. It acts as an air restriction when it is dirty. Now, if you clean it on a regular basis then it is probably ok to keep it on. I would rather change the filter a bit more often than clean, dry and reinstall the foam cover.
One other thing I have found is the A917C is about 1/8" larger in length, width and height thus it provides more filter surface than the foam-covered one. Why the size difference? I am sure this is due to the foam filter on the stock OEM air filter.


Stock OEM Filter
Note - There is about 10,000 miles on the filter in these photo's.


AC Delco A917C
Note - This a new filter.


Note the raised portion of the backing material. This helps hold the filter in position and keeps the bending to a minimum.