
Tech Tips
WIX Oil filter numbers
- Standard 1/2 quart - 57099
- Optional 1-quart - 51060 (5.178" tall)
- Optional 2-quart - 51794 (7.822" tall)
GM Oil Filter Numbers
- Standard 1/2 quart - PF454
- Optional 1-quart - PF1218
- Optional 2-quart - PF932
Notes:
- These oil filters use a standard 13/16x16 tread and are not metric as some may think. The 2-quart filter DOES NOT have an anti-drain back valve that the 1/2 quart and 1-quart do.
- NAPA filters are made by WIX.
- For WIX Warranty information review the document in the Downloads section.
Oil Change Reset Procedure
This needs to be done each time the oils is changed, otherwise the GM OLF (Oil Life Monitor System) can not correctly calculate the change interval.
- Turn the ignition to RUN, with the engine off.
- Fully press and release the accelerator pedal slowly three times within
five
seconds. If the CHANGE ENGINE OIL SOON message flashes, the system is
reset. However, if it stays on, it does not reset. Repeat the procedure. - Turn the key to OFF.
If you would like a bit more information on the GM OLF there is a PDF document in the Downloads section that you can download.
OEM Temp Gauge
The temperature gauge does not show the actual coolant temperature, but a range of temperatures. Here are the range of temperatures in Fahrenheit and Celsius.

At sea level the boiling point of water is 212 F or 100 C. But, with a 15-pound pressure cap (2.5 increase per lb of pressure) is about 249 F or 120 C. Now add a 50/50 solution of anti-freeze and water this increases the boiling point to 262 F or 128 C. So, if the temperature starts to climb you may want to shut down the engine before it gets to the last white line before the amber section.
One last thing to remember, the boiling point will drop about 2 per 1000 ft of altitude.
Allison 1000/2100 Transmission
The Allison transmission requires a filter change after the first 5,000 miles. After the initial filter chnge, Allison recommends a filter change every 50,000 miles or 24 months and a fluid change every 150,000 miles or 48 months.
Because most of us will never see the MAXIMUM miles we should be changing the filter every 2 years and the fluid every 4 years or have it tested by JG Lubricant Services.
Use only Allison Transmission filter # 29539579
Note
- Don't forget to clean/move the magnet from the old filter to the new filter.
Here is a list of the approved TES-295 vendors.
- Castrol - TranSynd
- BP - Autran TES295
- BASF - Emgard 2805
- International Truck - Fleetrite Synthetic ATF
- Exxon Mobil - Mobil Delvac/Mobil Delvac 1 Synthetic ATF
- Shell - Shell Spirax 56 ATF
- CNH Original Parts - CNH HD Synthetic ATF
- Phillips 66 - Triton 295 ATF
- Kendall SHP ATF
- Total - Fluidmatic Syn 295
- Renault Truck Oils -Starmatic A-Max
- Transtar - Transtar Allison 295
Notes:
- If you are switching from Dexron III to TranSynd you will need to do 2 complete fluid changes to get to 100% TranSynd fluid before you can go to the extended drain intervals.
- TranSynd - $30 to $45 a gallon
- It takes about 3 gallons for complete fluid change.
For more detailed information on recommended Allison fluids and change intervals review the documents in the Downloads section.
6/6/2009 Update
It should be noted that Mobil has changed the label on Mobil 1 Synthetic. I suspect this due to the fact that GM has dropped the licenses for Dexron III. See the next 2 photos and decide for yourself.
Old Label

New Label

150,000 Mile Coolant
The 8.1L engine comes from the factory filled with a 50/50 mixture of water & Dex Cool with a recommend change interval of 5 years or 150,000 miles. I doubt that any of us will ever see 150,000 miles in 5 years. So that means you change every 5 years or sooner. With the way an RV gets used I think it will be sooner rather than later.
With the high cost of labor ($90 to $120 per hour) I decided to change my own coolant after 3 years. But, I wanted to make the change inside my RV building and not make a big mess. So, I devised a plan to back flush, install new coolant and not have to remove any hoses or crawl under the rig to drain the radiator or remove any block plugs.
PARTS:
- Prestone Flush Kit - Wal Mart - $5
- New Pressure Cap - AutoZone/Local auto parts - $10
- 3 Gallons of anti-freeze - Wal Mart -$14
Note - The 8.1L Cooling System holds 24.5 Quarts of coolant. Therefore you will need about 3 gallons of antifreeze to get a 50/50 mix. - 4' of 1" plastic hose - TSC/Ace Hardware - $4
- 3' of 1/2" plastic hose - TSC/Ace Hardware - $2
- 1/2" Female water hose fitting - TSC/Ace Hardware - $2
- Oil filler adapter to fit the 1-gallon anti-freeze jug - Wal-Mart - $2
- Water hose shut off - Wal Mart - $2
- A place to PROPERLY dispose of your old anti-freeze.
Note - If you plan to use Dex-Cool the 50/50 ratio is probably a bit more critical than if you use a glycol-only anti-freeze.

How To: Drain & Flush
-
Install the Flushing TEE. In my case, I removed the Evans heater control valve and installed the Flushing TEE.
-
Remove the radiator cap and install the Splash tube and hose. Drop the hose in the 5-gallon bucket.
-
Attach the shut-off to the garden hose, attach the Back-flow preventer to the shut-off, remove the cap from the Flushing Tee and attach the Back-flow preventer to the TEE.
-
Turn on the water and open the shut-off valve. The old anti-freeze should start to flow into the 5-gallon bucket. Shut off the water and empty the bucket. Repeat until the water is clear.


How To: Add Ant-freeze
- Attach the female hose to one end of the 1/2" clear tube and attach the oil filler adapter to the other end of the clear tube.
- Open the jug of anti-freeze and attach the oil filler adapter to the jug of ant-freeze.
- Remove the water hose from the Flushing TEE and attach the female hose adapter to the Flushing TEE.
- Now tip the jug of anti-freeze up and squeeze it. This will force the anti-freeze into the system and the displaced water will run out of the radiator into the bucket.

Finish:
- Remove the Flushing TEE.
- Install the new radiator cap.
- Remove and clean the radiator overflow tank. Renisnatll the tank and add the appropriate amount of 50/50 mix of anti-freeze.
- Start the engine and let it come up to temp. Turn the heater to hot to circulate the water. This should purge the air in the system.
- When the engine is cool check the radiator level. Add 50/50 mix to bring the level to the top of the radiator.
- Don't be surprised if you have to add more 50/50 mix after your first trip out do to air pockets being purged.
Notes:
- At sea level the boiling point of water is 212 F or 100 C.
- A 15-pound pressure cap (2.5 increase per lb of pressure) adds 37.5 to raise the boiling point to 249 F or 120 C.
- Add a 50/50 solution of anti-freeze and water this increases the boiling point to 262 F or 128 C.
- The boiling point will drop about 2 per 1000 ft of altitude.
Alternate Method To Change The Coolant
Copied with permission from Max Hubrich.
I looked at the radiator coolant drain plug several times over the past few
years and was always wondering why it looked like it did?? It is not like the
old metal petcock style (similar to a small Winegard "bat wing" antenna) that
many of us dealt with over the years.
I finally figured it out, and oh, by
the way, it is located on the lower left corner -- Drivers side, (engine side-
facing to the rear).
My mission was to change out the coolant -- along with a
good flush.
Before I go any further, I know, unless you completely
disassemble the engine you cannot get ALL the old fluid out-- kinda like
changing transmission fluid.
I wanted to see the condition of the old
coolant before I used Oemy's flush method.
First thing you need is a 1/4" drive ratchet with a 4" extension-
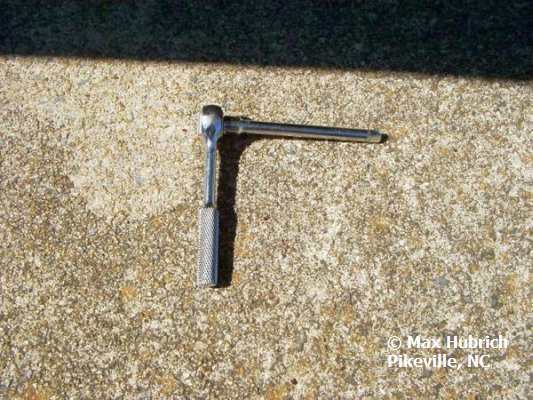
Here is a picture of the "little Devil" white nylon drain plug-- In the open position-- That's coolant coming out.

Make sure the engine is cooled down -- not hot!! The 1/4" square of the 4" ratchet extension fits into the square drain plug hole. Now, this is where you must be extra, extra careful---
- Gently, very, very gently, turn the drain plug just a WEE BIT counterclockwise. You will feel a little "snap"-- It is now unlocked and will start to seep.
- Now you gently, very gently again, turn it counterwise a little more (like a quarter, to a half turn) and it is now fully extended--about a half inch (as the picture shows). Go no further-- Do not try to remove it completely-- If you do, you will be probably buying a new radiator!! I understand there is an "O" ring inside the valve that does the sealing.
- Now move your bucket or pan under the rig and open/remove the radiator cap. Stand back as the fluid will now gush out.
Here is what my fluid looked like---

My fluid was "sparkling clean" with no debris, dirt or rust at all. After 6 refills of water, running the engine each time, with the dashboard heater valve set to the "full hot position". This is what the last drain of fluid looked like.

When you're all done, the radiator cap should be in this position. The arrows (which I highlighted) should be parallel to the vent tube to the overflow tank. This ensures that the cap is seated properly.

Because my old fluid was so clean I used Dex-Cool (the pink stuff) as the
refill type. A completely empty system will hold about 24 1/2 quarts. I bought
three gallons (only used two) of the full-strength stuff and mixed it 50/50 with
water.
It took about 4 hours to complete this coolant change because of
the run/cool process. Believe it or not, the hardest part of the whole operation
is getting the radiator cap on and off. It has two definite settings and you
must push down hard to release it from its second locking step.
The drain plug itself was a piece of cake! Good luck to those folks who want to "Do it Yourself".
Max H
100,000 Mile Spark Plugs
GM advertises that the AC Delco spark plugs or in some cases Denso spark plugs installed in the 8.1L engine have a service life of 100,000 miles. Although this may be true I would not leave them in the engine for that length of time. The biggest problem is the difficulty of removing the plug wires and spark plugs. I would suggest that if you are NOT planning on adding new plug wires and spark plugs you remove the plug wires and spark plugs at about 10,000 miles and service them as follows:
- When you remove the plug wires twist the coil and boot plugs before you remove them DO NOT pull on the wire, as it is the weakest part.
- Mark the wires and plugs so you can return them back to the cylinder they came out of.
- Add some dielectric grease to the coil and plug the boots.
- Check and re-gap the spark plugs.
- Never clean the plugs with any sort of chemical spray cleaner or air-powered abrasive cleaner just replace them.
- Add some Never Seize to the threads.
Why replace them?
Here is a set of Denso plugs with 78,000 miles on them.
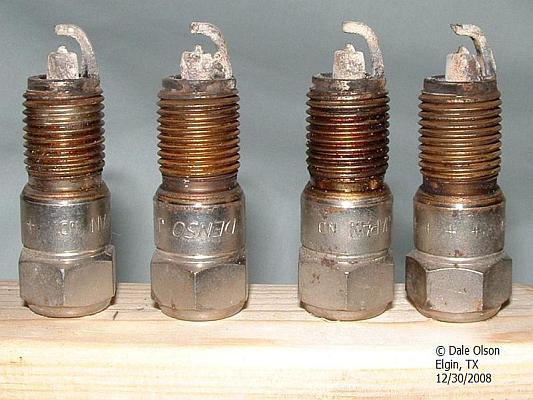

The 2 photos show the difference in the combustion flame travel, the platinum tips are almost gone and the gap is more than .60. The next photo shows the difference between new and old.

R&R Plug Wires and Spark Plugs
Tools/Supplies:
- 5/8" Spark Plug Socket
- 3/8" to 1/2" Adapter
- 1/2" Short Extension
- 1/2" Ratchet
- Tube of Never Seize
- Tube of Dielectric grease
Using a 1/2" ratchet gives you more leverage over a 3/8" ratchet to remove the spark plugs.
How To:
- Prep your plug wires with dielectric grease.
- Gap the plugs and add Never Seize to the threads.
- Start the engine and turn the wheels as far to the right as possible and turn off the engine.
- Now get something to kneel on and crawl under the rig.
- Remove all the plug wires first. DO NOT pull on the plug wire. Twist the coil boots and remove them first. Repeat with the plug boots.
- Remove the plugs
- Install the new plugs. Hand tighten and add about 1/4 turn with the ratchet.
- Install the new wires.
- Repeat for the other side, just remember to turn the wheels to the left.
NOTE
Just in case you break a wire when you try to remove it from
the spark plug you will find that it is almost impossible to get the remaining part of
the wire off. So, how do you remove the spark plug as the broken wire is now sticking
out of the spark plug socket. Just tape a 3/4" socket to the spark plug socket
to give you an EXTRA deep plug socket.

PLEXUS Plastic Cleaner
Are you looking for nonabrasive plastic cleaner for your headlights and/or tail lights?
- Do you have Diamond Shield installed or some other clear protection shield on your coach?

Then Plexus is the very best you can buy. It is easy ON and easy OFF. I ONLY use a micro fiber cloths to apply and buff.
There is only 1 Warning on the can, "Do not use paper towels".
I have Dimond Shield installed on my coach and after about 2 applications bugs come off with just cool water and a microfiber cloth.
Where to Buy: Hectors Hardware $6.99
Windsheild Wiper Refills and Renew
Finding 24" windshield wiper refills for Dyna (made in Brazil) wiper blades is almost impossible. The dealer wants to sell you a whole new blade for about $25 a piece. So, I spent some time digging around the net and finally found that NAPA has refills for the Dyna brand wiper blades.
- NAPA Part # 60-2410 - Quantity 2 per package - $7.50
While I was in the process of installing the wiper blade refills I decided to repaint the wiper blade hardware. The paint on the wipers had faded badly.
- I used a scotch bite pad and clean them up.
- Next I used some painter's tape and newspaper to mask off the wipers and windshield.
- Next I wiped the wiper hardware down with solvent dampened lint free rag.
- Lastly I sprayed 2 coats of BBQ black paint.
